
What is on this page?
Fractional Advertisements
–Full Service
–Self Service
Full Page Advertisements
–Full Service
–Self Service
–HTML5/Custom
NOTE: Full Service vs. Self Service – In addition to extracting the article text and images from your PDF, you can also request that GTxcel extract all fractional and full page ads from your PDF to appear within your article content in Reading View.
Fractional Advertisements
Full-Service Fractional Ad Placement
Fractional and Full Page ads will be extracted along with the articles from your PDFs. They will be flattened to static images and will automatically be placed into article content, where they sequentially appeared within the original PDF. All fractional ads will be wrapped with a banner, identifying the element as an advertisement, which will automatically be linked to the printed URL that appears within the ad. Additionally, all extracted ads can be tapped/clicked on to enlarge.
Things to keep in mind:
- All searchable text in ads will be extracted and provided for screen readers (for WCAG Compliance).
- If fractional ads fall outside of an article, it will be placed in a separate “Additional Ads” article.
- Ads are assigned names for tracking analytics, the tracking name will be either the Advertiser name or the main heading of the ad.
- The most prominent URL will be the URL used to link the ad (ads can link out to only a single URL).
Self-Serve Fractional Ad Placement
Fractional Ads can also be manually inserted into individual articles using the Article Editor whether or not ads are being extracted for you.
To insert an ad, click the Advertisement button in the toolbar.

This will open the Advertisement dialog, which has two tabs.
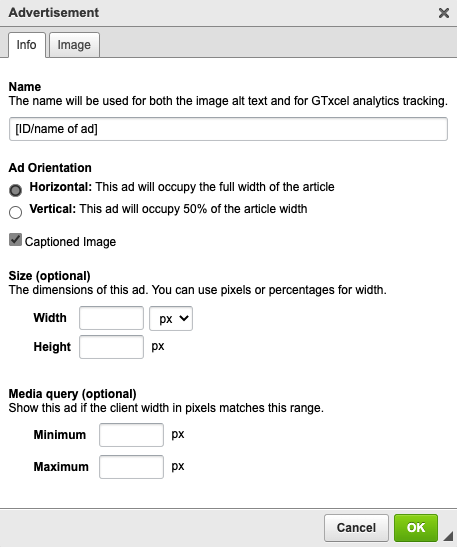
Info Tab
The Info Tab contains general settings that apply to all in-article ads.
Name – This should be a unique name for tracking purposes. If you use the same name for more than one ad within an issue, those ads will be combined in your analytics reports. In most cases you will want to use different names for each ad in a document. This field will also be used for the Alt text for WCAG compliance.
Ad Orientation – This will set the width of the ad, 100% (horizontal) or 50% (vertical) of the width of the screen.
Ad Captioning – Check off ‘Captioned Image’ to add a caption to your ad. This is done for you with ad extraction. This is important for WCAG compliance.
Size (optional) – Used to determine the size of the ad. These dimensions should exactly match the size of the ad. For fixed-size ads, you should use pixel values for both width and height. For responsive ads, you may want to use a percentage width.
Media query (optional) – The media query settings are used to control what devices your ad will appear on. The ad will only be displayed if the browser window width is between the Minimum and Maximum. If you leave these settings blank, your ad will always appear. Keep in mind that your ad may be cut off if it is too large for the device.
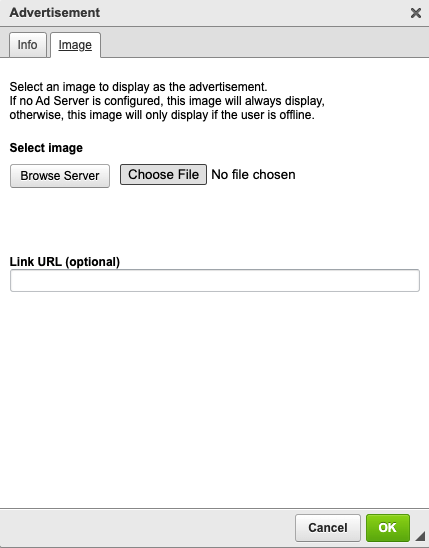
Image Tab
Select Image
Browse Server – Used to choose an image that has already been uploaded. This is useful if you are trying to place the same ad more than once in a document.
Choose File – Used to upload the ad image from your device.
Link URL (optional) – The link to open when a user clicks on the ad image.
Full Page Advertisements
Full-Service Full Page Ad Extraction
Fractional and Full Page ads will be extracted along with the articles from your PDFs. You will have the ability to edit, re-order or delete any full page ads that are created by using the Article Editor.
Things to keep in mind:
- All searchable text in full page ads will be extracted and provided for screen readers (for WCAG Compliance). This text will be displayed under the image by default, but can be hidden upon request.
- Ads are assigned names for tracking analytics, the tracking name will be either the Advertiser name or the main heading of the ad.
- The most prominent URL will be the URL used to link the ad (ads can link out to only a single URL).
Self-Service Full Page Advertisements
You have the ability to place Full Page ads through the Article Editor whether or not ads are being extracted for you.
- Open the Article Editor
- Click on the “ADD NEW ARTICLE” button
- Fill in the following fields
- Title: this needs to be a unique name for your ad, the title is not visible to end users and is also used for tracking purposes.
- Template: Choose the ‘Advertisement’ template.
- Pages: add the page number that the ad appears in the Page View (this is optional and only important if you would like the capability of toggling back and forth from Reading View and Page View).
- Body: Click on the ‘Source’ option and paste the following into the body:
<div class="htmlBody article_div" data-link="">
<div class="fullPageAd">
<div class="fullPageAdImages">
<figure class="fullPageAdLg"><img alt="" ref="./img/full_page_ad.jpg" src="http://staging4.texterity.com/collection/document/data/articles/./img/full_page_ad.jpg" /></figure>
</div>
</div>
</div>
4. Once the html is pasted into the body of the article, add the full URL for your ad between the quotation marks in the data-link tag on the first line (data-link=””), then click on the source button again.
5. Double click on the image, this will bring up the Image Properties box. Upload the image of your Full Page Ad and add a very brief description of the image in the ‘Alternative Text‘ field.
6. Click Save.
7. Go back to the list of articles, drag and drop the advertisement to the desired position.
HTML5/Custom Full Page Advertisements
There are almost unlimited possibilities to what types of content that can be created, ranging from something as simple as a static image or page to an interactive product catalog or video game — as long as you or your advertiser can create and supply it to us in zipped HTML format.
See our HTML5 Ad Templates on Github
FORMATS
For your ad to work properly on both tablets and small mobile devices, make sure your HTML is set up either to be responsive or to include different layouts for landscape, portrait and phone screens. A user viewing the app in a format you have not provided will not see your ad.
The final format you will provide is a zipped package of html and assets, which you’ll upload via the Publisher Dashboard. You may create these files by hand or with a interactive HTML5 animation tool. If you are using one of the recommended tools, you should be able to export and zip the project file.
IMAGE SIZES
If you plan to use background images for your ads or simply repurpose static creative, jpg images at 72 DPI at the retina resolution for a given screen (for example, 2048 x 1536 for iPad) will give the best balance between quality and performance. Images that have a larger DPI or larger resolutions will take longer to load without any benefit in quality.
RECOMMENDED CREATION TOOLS
- Adobe Edge
- Sencha
THE HTML PACKAGE NEEDS TO INCLUDE:
- an index file
- any necessary html files
- all referenced assets (e.g. images) should be included, so they can be visible when users are offline.
TIPS WHEN CREATING YOUR HTML5 FILES:
- You should configure links to open in a new window (such as when linking to the advertiser’s site).
- Use percentages or media queries to scale your ad
- If you want to create a single fluid ad that scales to fit the device, use percentage-based sizing.
- If you want to create several layouts so that your ad fit better on different devices, you should use media queries. Within each breakpoint, you will usually still want to use percentages so that your add stretches to fit on each device.
- Do not rely on the viewport tag for scaling. These ads are displayed within an iframe, which will disable viewport-based scaling. If you are using Tumult Hype, please be aware that it’s default scaling method uses viewport. You will need to choose one of the above approaches instead.
LIMITATIONS
- Full-screen is the only supported size for Full Page ads
- Iframe content is not recommended
- Do not use Javascript to take over the browser window
- Be aware that excessive swipe-based interactivity can make it difficult for users to navigate away from the ad to the next piece of content.
- For your ad to function in offline mode as well as online, all referenced files should be included (use relative paths) – not referenced from external websites – with the exception of video.
- Video:
- Be aware that streaming video can not be made available to offline users.
- If you are capable of hosting your own video, you can embed it in an ad using the standard HTML5 <video> tag. Make sure that your video file is in a format that is compatible with mobile devices.
UPLOADING AND PLACING YOUR HTML5 AD
When your HTML5 files are complete, upload via the Publisher Dashboard as follows. Contact your Customer Success Team if you do not have access to the Publisher Dashboard.
- Log in and locate the applicable issue
- Click “Upload files” on that issue
- Select “Interstitial ads” from the upload category pulldown menu
- Select your zipped html package file(s)
- After files upload you should see a confirmation screen asking to verify the index file. Fill this out and continue.
- If you receive an error message instead of a confirmation review the above requirements and try again.
- This upload creates a brand new article with the files uploaded.
- Open the Article Editor and find your new article.
- Drag and drop the new article to the desired location.
 Contact Support